When a bad storm tears through your area, you can expect a significant amount of damage to follow in its wake. Your roof may even be one of many that sustain damage, and when that happens, you’ll want to call a local roofing company for an inspection right away.
If this is your first time dealing with storm damage to your roof, you’re probably wondering what the next steps are — as in what you can rightfully expect during a storm damage inspection. The inspection process doesn’t take too look, usually around one to two hours
Below, we’ll cover all of the details so you’ll know exactly what happens during a roof inspection and then some.
The Roof Storm Damage Roof Inspection Process

The entire point of scheduling a roof inspection for recent storm damage is so your roofing contractor can assess the damage and come up with a plan for the repairs or replacement. Of course, the overall inspection process is a bit more involved.
Here’s what you can expect from the inspection process from start to finish:
1) The Pre-Appointment Call
This is essentially when you would call your local roofer and describe the damages you see or suspect. The roofer will schedule an appointment to come and inspect your roof, usually within 24 to 48 hours, and they’ll likely explain their usual process so you know what to expect when they get there.
2) The Exterior Inspection
Once your roofer arrives at your home, they’ll carry out an initial inspection that involves walking around your home’s exterior. They’ll essentially be looking for damage sustained to ground-level objects, such as holes in window screens, cracks in windows, missing or broken siding, damage to downspouts, and so on.
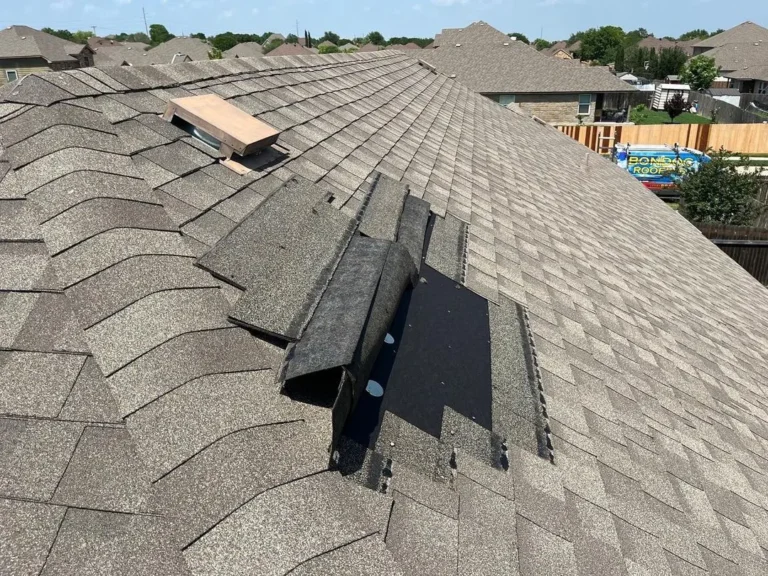
3) The Roof Inspection
Next, your roofing contractor will want to get up close and personal with your roof. They’ll climb up and inspect the various components of your roof, assessing their integrity and looking for things like damaged roof flashing, creased shingles, granule loss, impacted gutters, and damage done to the other components.
4) The Attic Inspection
The roofer will also want to inspect your attic to evaluate its structure and check for any leaks or water damage. In addition to your attic, they’ll inspect your top-level floor as well as walls and ceilings to determine the extent of the damage.
5) The Report
Throughout the entire inspection, the roofer will be taking extensive notes regarding the damage as well as photos. This will become a key element when filing an insurance claim with your homeowners insurance company. Aside from using the details in the report to fill out the form, you’ll likely need to also provide your insurance company with a copy of the report.
6) The Estimate
Lastly, the roofer will provide you with a written estimate of how much your roof repair or roof replacement will cost. This estimate should factor in the labor, materials, and complexity of your roofing system to bring the number as close as possible to an approximation. A reputable roofer will provide you this estimate with no obligation, meaning you don’t have to hire them for the roof repairs if you don’t want to.
What You Can Do Before Your Storm Damage Roof Inspection

While there’s not much you can do in the way of properly evaluating damage to your roof or the rest of your home, there are a few things you can do to prepare for your roof inspection. These things will make it easier for your roofer to do their job, and they’ll make it easier for you to move forward with the next steps.
- Make sure the pathway to your attic is clear. Your attic is one of the primary areas of focus during an inspection. The roofer will need space to move around and assess the damage. This means you’ll need to clear out your attic as much as possible if you use it for storage — just don’t touch anything that appears to be damaged so that you don’t cause further damage.
- Be aware of your roof’s age and current condition. You don’t have to be a roofing expert to know whether or not your roof is older or has other issues. Be sure to take a walk around your home — inside and out — to see if you notice any damages that may have been caused by the recent storm. Doing this will allow you to get the roofer started out with the right information and ensure they don’t miss anything. What’s more, it’ll allow the roofer to determine if the damage was due to the storm or wear and tear — which will also be important for your insurance claim.
- Take your own photos. While it’s true that the roofer will document the storm damage and provide you with photos, it’s a good idea to take your own in case the course of the storm damage changes over the next 24 to 48 hours. In this instance, you can show the roofer to help them determine the severity of the storm damage.
- Call your homeowners insurance company. If you suspect that you have storm damage, you’ll want to call your homeowners insurance company to review your policy and find out which claims form you’ll need to fill out. It’s also a good opportunity to find out what they’ll be needing from you specifically, so you have a better chance of getting your claim approved.
The Next Steps
When you call the right roofing professional, your storm damage roof inspection should be a breeze. Not only will they walk you through the entire process, but the most reputable roofers provide insurance claim assistance, so you’re not alone in dealing with your insurance agency. Once your claim is approved, you can schedule the roof repair or replacement and put all of the stress behind you.
For stress-free inspections and other roofing needs, call the expert roofers at Bondoc Roofing. Not only do we provide free roof inspections, but we also offer insurance claims assistance and emergency services. Get in touch with us today to schedule your next roof inspection or to ask about our other roofing services!